DJI MIC Mini is Launched : Here is a review Post 24 hrs of usage. DJI MIC Mini Key Features Prices Availability Whats Included Advantages Limitations and Value.
DJI MIC Mini is Launched : Here is a review Post 24 hrs of usage. DJI MIC Mini Key Features Prices Availability Whats Included Advantages Limitations and Value.
DJI MIC Mini is Launched : Here is a review Post 24 hrs of usage. DJI MIC Mini Key Features Prices Availability Whats Included Advantages Limitations and Value.
DJI MIC Mini is Launched : Here is a review Post 24 hrs of usage. DJI MIC Mini Key Features Prices Availability Whats Included Advantages Limitations and Value.
DJI MIC Mini is Launched : Here is a review Post 24 hrs of usage. DJI MIC Mini Key Features Prices Availability Whats Included Advantages Limitations and Value.
DJI MIC Mini is Launched : Here is a review Post 24 hrs of usage. DJI MIC Mini Key Features Prices Availability Whats Included Advantages Limitations and Value.
DJI MIC Mini is Launched : Here is a review Post 24 hrs of usage. DJI MIC Mini Key Features Prices Availability Whats Included Advantages Limitations and Value.
DJI MIC Mini is Launched : Here is a review Post 24 hrs of usage. DJI MIC Mini Key Features Prices Availability Whats Included Advantages Limitations and Value.
The DJI Mic Mini is a small, lightweight, and budget-friendly wireless microphone designed for creators who need versatile audio solutions. It works seamlessly with both mobile devices and cameras, offering portability without compromising audio quality. In this detailed review, we’ll cover everything about the DJI Mic Mini, from its features and setup to its pros and cons. By the end, you’ll have a clear idea of whether this microphone is right for your needs.
What’s Included in the DJI Mic Mini Kit?
The DJI Mic Mini is available in different kits to suit various needs. The most popular kit includes:
Two transmitters
One receiver
A charging case
A USB-C adapter for mobile and computer connections
Two wind muffs (black and gray for different conditions)
A 3.5mm cable for connecting to cameras
A USB-C cable for charging
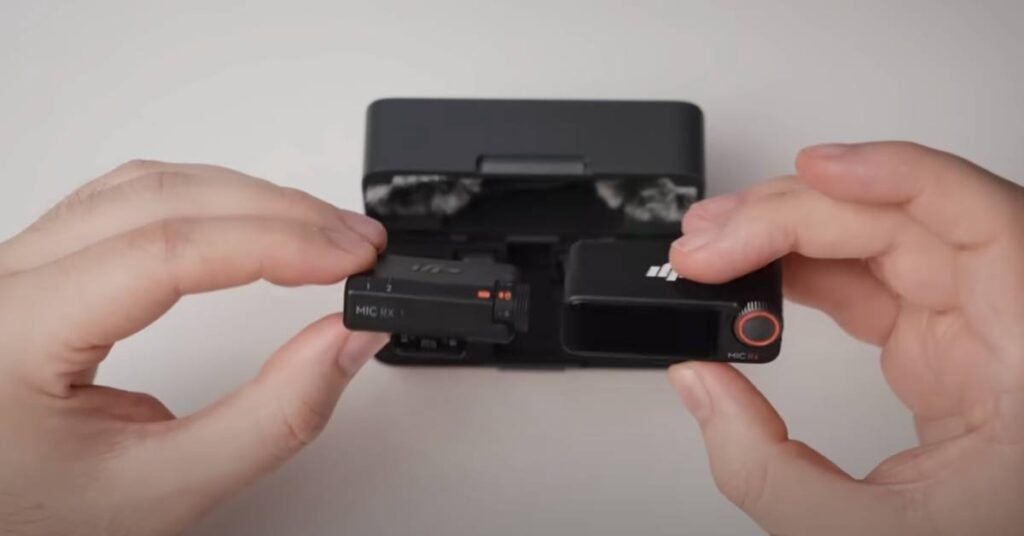
Everything fits snugly into a compact charging case that also stores essential accessories, making it ideal for creators on the go. The inclusion of wind muffs is especially helpful for recording in windy conditions, ensuring consistent audio quality.
Compact Design and Build Quality
Transmitter
The DJI Mic Mini transmitter is extremely small and lightweight, weighing only 10 grams. This makes it nearly half the size of the DJI Mic 2, offering greater comfort and discretion. Whether you’re wearing a white or black shirt, the mic blends well with your outfit, making it less noticeable.
Key Features of the Transmitter:
Magnetic Clip: Attach it easily to any clothing using the built-in clip or magnet.
Microphone with Wind Muff: Protects against wind noise, ensuring clear sound quality.
Battery Life: Offers an impressive 11 hours of battery life, rechargeable via the charging case.
Noise Cancellation: Activate noise cancellation directly using the DJI Mimo app or the transmitter’s power button.
Receiver
The receiver is compact and smaller than its predecessor, the DJI Mic 2 receiver. It features:
Gain Control Dial: Adjust microphone volume easily without needing an app.
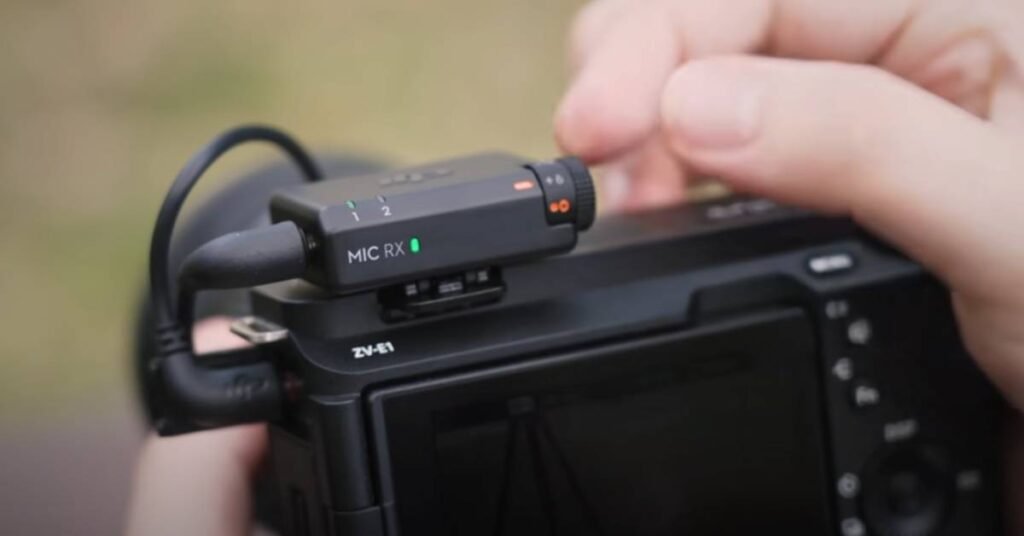
Hot Shoe Clip: Mount it on cameras with ease.
Ports: Includes a 3.5mm jack for output or headphones, and a USB-C port for charging or phone connection.
Plug-and-Play Connectivity: Automatically connects to transmitters when removed from the charging case.
Compact Design and Build Quality
The DJI Mic Mini stands out for its portability and discreet design. Each transmitter weighs just 10 grams, making it comfortable to wear without pulling down on your clothing. In comparison, it’s half the size of the larger DJI Mic 2, which adds to its appeal for creators who prioritize lightweight equipment.
Sleek Color Options
The DJI Mic Mini is available in both black and white. The white version blends better with lighter-colored clothing, reducing visibility during recordings. This thoughtful design ensures that the microphone doesn’t distract from the content.
Convenient Clip and Magnetic Mount
Each transmitter features a sturdy clip for attaching it to clothing or accessories. It also has a magnetic mount, allowing for more versatile placement. Whether you’re clipping it to a collar or attaching it magnetically, the setup is secure and user-friendly.
Key Features of the DJI Mic Mini
1. Impressive Battery Life
Each transmitter offers an 11-hour battery life, outperforming many competitors. The charging case ensures that your equipment is always ready to use, and features like automatic shutoff after 15 minutes of inactivity further conserve battery power.
2. Simplified Connection and Pairing
The transmitters and receivers automatically pair when removed from the charging case, saving time during setup. A connect button allows for easy manual pairing or adjustments when needed.
3. Noise Cancellation
With built-in noise cancellation, the DJI Mic Mini ensures clear audio even in noisy environments. This feature can be fine-tuned using the DJI Mimo app, allowing users to customize the strength of noise suppression.
4. Audio Limiting Feature
A built-in audio limiter prevents distortion when recording at varying volumes. Whether you’re speaking softly or loudly, the audio remains clear and balanced, making it foolproof for creators of all skill levels.
5. Multiple Recording Modes
The DJI Mic Mini offers versatile recording options:
Mono Mode: Records audio from one transmitter, ideal for single-person setups.
Stereo Mode: Separates audio from two transmitters onto distinct tracks, allowing for better post-production edits.
Safety Track: Captures audio at two levels—a primary track at standard volume and a backup at a lower level—ensuring usable audio even during volume spikes.
Receiver Features
The DJI Mic Mini receiver is compact and packed with useful features:
Hot-Shoe Mount Compatibility: Easily attaches to cameras.
Adjustable Gain Dial: Fine-tune audio levels directly on the receiver without accessing an app.
Dual Purpose 3.5mm Output: Functions as both an audio output for cameras and a headphone jack for monitoring sound in real time.
USB-C Port: Allows charging the receiver while in use and can also charge connected devices.
The receiver’s design prioritizes ease of use, making it simple for creators to adjust settings on the fly.
Use the 3.5mm cable to connect the receiver to the camera’s microphone input.
Ensure the receiver and transmitters are powered on (indicated by green lights).
Adjust gain levels as needed using the dial on the receiver.
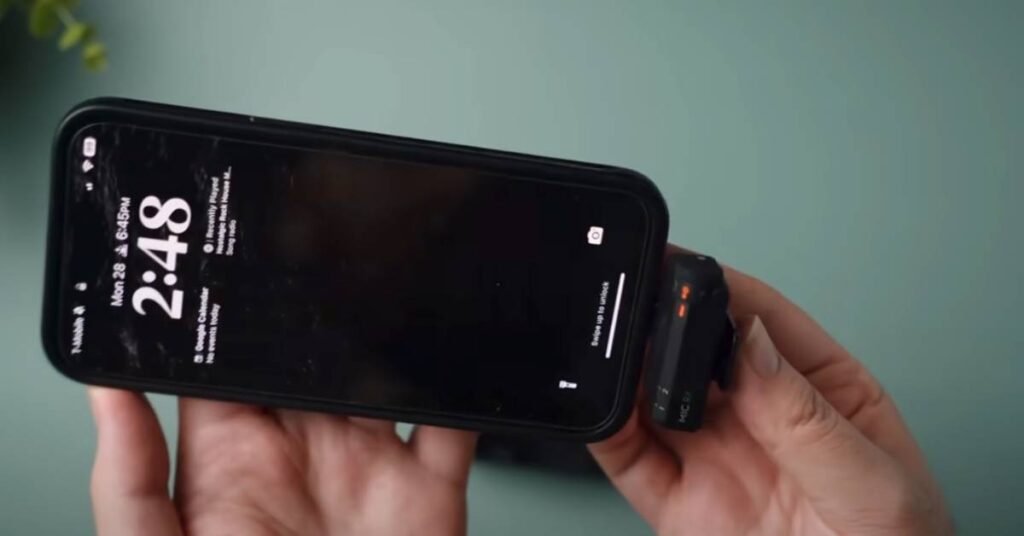
For Mobile Devices
Attach the USB-C adapter to the receiver.
Plug the receiver into the phone’s USB-C port.
Pair the transmitters, and start recording using your preferred app.
This simple setup process ensures creators can quickly switch between devices.
Real-World Performance
Audio Quality
The DJI Mic Mini delivers clear, professional-grade audio, suitable for vlogs, interviews, and live streams. Noise cancellation and audio limiting enhance its performance in challenging conditions.
Distance and Range
The microphone boasts a range of up to 400 meters in ideal conditions. During tests, it maintained consistent audio quality over long distances, making it suitable for a variety of filming scenarios.
Versatility
The system works seamlessly with cameras, mobile devices, laptops, and even DJI Osmo products like the Action 4 and Pocket 3. It’s a versatile tool for creators who need a reliable microphone for diverse setups.
Advantages of the DJI Mic Mini
Compact and Lightweight: Easy to carry and wear.
Long Battery Life: Eliminates worries about running out of power during shoots.
Versatile Compatibility: Works with cameras, phones, laptops, and DJI Osmo devices.
Noise Cancellation and Limiting: Ensures consistent, high-quality audio.
Affordable Pricing: Competitive price point for its feature set.
Limitations of the DJI Mic Mini
No External Mic Input: Unlike some competitors, the transmitters lack a port for connecting lavalier microphones.
No Built-In Recording: The system doesn’t offer onboard recording like the DJI Mic 2, limiting backup options.
Bulky Receiver Design: The receiver sticks out awkwardly when connected to phones, which may inconvenience some users.
Bluetooth Limitations: While Bluetooth connectivity is available, the audio quality is subpar compared to using the receiver.
Pricing and Value
The DJI Mic Mini is available in three configurations:
Full Kit (2 transmitters, receiver, charging case): $169
Basic Kit (1 transmitter, receiver, no case): $89
Single Transmitter Only: $59
These options cater to different budgets and needs, offering flexibility for creators who prioritize portability and performance.
Conclusion: Is the DJI Mic Mini Worth It?
The DJI Mic Mini strikes an impressive balance between portability, performance, and price. Its lightweight design, long battery life, and ease of use make it an excellent choice for content creators, vloggers, and professionals who need reliable audio solutions. While it has a few minor drawbacks, such as the lack of external mic input and built-in recording, its overall value and versatility make it a standout option in its price range.
Whether you’re filming on a camera, smartphone, or DJI Osmo device, the DJI Mic Mini is a fantastic tool that simplifies the audio recording process. If you’re looking for an affordable, high-quality wireless microphone, this one is worth considering.
You Can Find More Official Detail on this from DJI Website
In 2024, Samsung released three compelling smartphones: the Galaxy F55, Galaxy C55, and Galaxy M55. With similar specifications and price points, choosing the right one can be challenging. This detailed comparison will help you decide which model offers the best value for your needs.
Design and Build Quality
All three models share the same dimensions and weight, coming in at 163.9 x 76.5 x 7.8 mm and 180 g. They feature a glass front, silicone polymer back, and a plastic frame, ensuring durability and a premium feel. The F55 and C55 come in Black and Apricot, while the M55 offers Dark Blue and Light Green.
Display: Vibrant and Smooth
Each phone boasts a 6.7-inch Super AMOLED+ display with a 120Hz refresh rate and 1000 nits of peak brightness. The resolution of 1080 x 2400 pixels provides a sharp and vibrant viewing experience, and all models include an always-on display feature.
Performance: Power-Packed with Snapdragon 7 Gen 1
Under the hood, all three smartphones are powered by the Qualcomm SM7450-AB Snapdragon 7 Gen 1 chipset, paired with an octa-core CPU and Adreno 644 GPU. This combination ensures smooth performance for gaming and multitasking.
Memory and Storage: Ample Options
Galaxy F55: Available in 128GB 8GB RAM and 256GB 8GB RAM, with a microSDXC slot for expandable storage.
Galaxy C55: Offers 256GB 8GB RAM and 256GB 12GB RAM, also supporting microSDXC expansion.
Galaxy M55: Comes in 128GB 8GB RAM, 256GB 8GB RAM, and 256GB 12GB RAM variants, with microSDXC support.
Camera: Capturing Moments in High Definition
Each phone features a versatile triple-camera setup:
Main Camera: 50 MP, f/1.8 (wide), 1/1.56″, 1.0µm, PDAF, OIS
Ultrawide: 8 MP, f/2.2, 123˚
Macro: 2 MP, f/2.4
Video capabilities include 4K@30fps and 1080p@30/60fps with gyro-EIS and OIS. The selfie camera is a 50 MP, f/2.4 (wide) shooter, capable of 4K@30fps and 1080p@30/60fps video recording.
Battery and Charging: Long-Lasting and Fast
All three models house a 5000 mAh non-removable battery, supporting 45W wired charging. This ensures you get a full day of use with minimal downtime.
Connectivity and Extras: Modern Standards
Network: GSM / HSPA / LTE / 5G
Wi-Fi: 802.11 a/b/g/n/ac/6, dual-band, Wi-Fi Direct
Bluetooth: 5.2, A2DP, LE
Positioning: GPS, GALILEO, GLONASS, BDS, QZSS
NFC: Yes
USB: Type-C 2.0, OTG
All models include an under-display fingerprint sensor, accelerometer, gyro, proximity sensor, and compass. However, none of the phones have a 3.5mm jack, infrared port, or FM radio.
Galaxy F55: Best for budget-conscious users looking for a solid all-rounder with expandable storage. Galaxy C55: Ideal for those who prioritize higher RAM and storage capacity, though pricing may vary by region. Galaxy M55: Offers a unique color palette and similar specs, making it a strong contender for those who want a stylish and powerful device.
Ultimately, the choice depends on your specific needs and budget. Each phone offers excellent performance, a stunning display, and a robust camera setup, ensuring you won’t go wrong with any of these Samsung models.
Samsung Galaxy Watch FE vs. Samsung Galaxy Watch6: Smartwatches have become an essential gadget for tech enthusiasts, combining functionality, style, and health monitoring features. Samsung has been a prominent player in this domain, and its Galaxy Watch series is a testament to its commitment to innovation. This article compares the latest models: the Samsung Galaxy Watch FE and the Samsung Galaxy Watch6. By the end, you’ll know which one suits your needs best.
Design and Build Quality:
Samsung Galaxy Watch FE
Dimensions: 40.4 x 39.3 x 9.8 mm
Weight: 26.6 g
Build: Glass front (sapphire crystal), aluminum frame
Water Resistance: 50m/5ATM, IP68 dust/water resistant, MIL-STD-810H compliant
Other Features: ECG certified, compatible with standard 20mm straps
Samsung Galaxy Watch6
Dimensions: 42.8 x 44.4 x 9 mm
Weight: 33.3 g (44mm), 28.7 g (40mm)
Build: Glass front (sapphire crystal), aluminum frame
Water Resistance: 50m water resistant (IP68), MIL-STD-810H compliant
Other Features: ECG certified, blood pressure monitor, compatible with standard 20mm straps
Analysis: Both watches are designed with durability in mind, boasting sapphire crystal glass and aluminum frames. However, the Galaxy Watch6 offers a larger display and additional features such as a blood pressure monitor.
Display
Samsung Galaxy Watch FE
Type: Super AMOLED
Size: 1.2 inches
Resolution: 396 x 396 pixels (~330 ppi density)
Protection: Sapphire crystal glass
Features: Always-on display
Samsung Galaxy Watch6
Type: Super AMOLED
Size: 1.5 inches
Resolution: 480 x 480 pixels (~327 ppi density)
Protection: Sapphire crystal
Features: Always-on display
Analysis: The Galaxy Watch6 takes the lead with a larger and higher-resolution display, making it more suitable for users who prioritize screen real estate and clarity.
Performance and Hardware
Samsung Galaxy Watch FE
OS: Android Wear OS 4, One UI Watch 5
Chipset: Exynos W920 (5 nm)
CPU: Dual-core 1.18 GHz Cortex-A55
GPU: Mali-G68
Memory: 16GB 1.5GB RAM
Samsung Galaxy Watch6
OS: Android Wear OS 4, One UI Watch 5
Chipset: Exynos W930 (5 nm)
CPU: Dual-core 1.4 GHz Cortex-A55
GPU: Mali-G68
Memory: 16GB 2GB RAM
Analysis: The Galaxy Watch6 offers a slight performance boost with a faster CPU and more RAM, which can enhance multitasking and overall responsiveness.
Analysis: Both models offer comprehensive connectivity options and sensor arrays. The addition of a thermometer in the Galaxy Watch6 provides enhanced health tracking capabilities.
Battery Life
Samsung Galaxy Watch FE
Battery Type: Li-Ion 247 mAh, non-removable
Charging: Wireless (Qi)
Samsung Galaxy Watch6
Battery Type: Li-Ion 425 mAh, non-removable
Charging: 10W wireless
Analysis: The Galaxy Watch6 significantly outperforms in battery capacity and charging speed, offering longer usage times and quicker recharges.
Price and Availability
Samsung Galaxy Watch FE
Price: €219.00
Availability: Released June 24, 2024
Colors: Black, Pink Gold, Silver
Models: SM-R861
Samsung Galaxy Watch6
Price: €215.90
Availability: Released August 11, 2023
Colors: Graphite, Silver, Gold
Analysis: The Galaxy Watch6 is slightly more affordable and offers a wider range of color options. Both models are available and cater to different aesthetic preferences.
Both the Samsung Galaxy Watch FE and the Galaxy Watch6 are excellent choices, each with its unique strengths. If you prioritize a larger display, better performance, and more extensive health monitoring features, the Galaxy Watch6 is the better option. On the other hand, if you prefer a lighter watch with comparable functionality and are okay with a slightly smaller display, the Galaxy Watch FE is a great choice.
Ultimately, the decision depends on your specific needs and preferences. Both watches exemplify Samsung’s commitment to quality and innovation in the wearable tech market. Choose the one that aligns best with your lifestyle and enjoy the myriad of features each offers.
The Vivo X100 Ultra is here, and it’s redefining what we expect from a flagship smartphone. With state-of-the-art technology and a sleek, durable design, this device is poised to capture the attention of tech enthusiasts and everyday users alike. Let’s explore what makes the Vivo X100 Ultra an unparalleled powerhouse in the smartphone market.
The Vivo X100 Ultra boasts a stunning design that combines aesthetics with durability. With dimensions of 164.1 x 75.6 x 9.2mm and weighing 229g, the device feels substantial yet comfortable in hand. The glass back and aluminum frame lend it a premium look and feel, while the IP69/IP68 dust and water resistance (up to 1.5m for 30 minutes) ensure that it can withstand the elements with ease.
2. Exceptional Display: Visual Brilliance
The X100 Ultra features a 6.78-inch LTPO AMOLED display that supports 1 billion colors. With a resolution of 1440 x 3200 pixels, a 20:9 aspect ratio, and an impressive 517ppi, the display delivers sharp, vibrant visuals. The 120Hz refresh rate ensures smooth scrolling and gaming, while Dolby Vision and HDR support provide an immersive viewing experience. The peak brightness of 3000 nits makes it easy to use even in direct sunlight.
3. Cutting-Edge Performance: Speed and Efficiency
At the heart of the Vivo X100 Ultra is the Qualcomm SM8650-AB Snapdragon 8 Gen 3 chipset, built on a 4nm process. The octa-core CPU, comprising a mix of Cortex-X4, Cortex-A720, and Cortex-A520 cores, delivers exceptional performance for any task. The Adreno 750 GPU ensures smooth graphics rendering for gaming and multimedia applications. With memory options of 256GB with 12GB RAM, 512GB with 16GB RAM, and a staggering 1TB with 16GB RAM, the device offers ample storage and swift multitasking capabilities, thanks to UFS 4.0 storage technology.
4. Advanced Camera System: Photography Excellence
The Vivo X100 Ultra’s camera setup is truly revolutionary. The rear camera system includes:
50 MP Wide (Main): With an f/1.8 aperture, 1/0.98″ sensor, and gimbal OIS, it captures detailed, stable shots even in low light.
200 MP Telephoto: Featuring an f/2.7 aperture, 1/1.4″ sensor, and 3.7x optical zoom, this lens offers incredible zoom capabilities.
50 MP Ultra Wide: The f/2.2 aperture and 116˚ field of view are perfect for capturing expansive landscapes.
The front camera is a 50 MP sensor with an f/2.5 aperture, ensuring stunning selfies with great detail.
The device supports 8K video recording at 30fps and a variety of 4K recording options, along with gyro-EIS for stabilized footage. Cinematic mode and Dolby Vision HDR enhance your video recording capabilities, making the Vivo X100 Ultra a fantastic tool for videography enthusiasts.
5. Battery Life and Charging: Uninterrupted Usage
The Vivo X100 Ultra is powered by a robust 5500mAh battery that provides extensive usage time. The 80W wired charging ensures that the battery can be quickly recharged, minimizing downtime. Additionally, the 30W wireless charging offers the convenience of cable-free charging. The reverse wired charging feature is a handy addition for powering other devices on the go.
Staying connected is effortless with the Vivo X100 Ultra. The device supports 5G for blazing-fast internet speeds. It also features dual SIM capability, Wi-Fi 7, Bluetooth 5.4 with aptX HD and aptX Adaptive, and NFC for seamless payments. The inclusion of an infrared port adds versatility, allowing the phone to be used as a remote control for various devices.
7. Additional Features: Safety and Convenience
The Vivo X100 Ultra comes with a plethora of additional features designed to enhance user experience. The under-display ultrasonic fingerprint reader provides fast and secure access to the device. The stereo speakers deliver rich, immersive sound quality, making it perfect for media consumption. The emergency SOS via satellite, available in the 16GB + 1TB model, is a standout feature for safety, allowing calls and messages even in remote areas without cellular coverage.
8. Software Experience: Smooth and Intuitive
Running on Android 14 with Vivo’s OriginOS 4, the X100 Ultra offers a clean, intuitive user interface. OriginOS 4 brings a host of new features and improvements, enhancing usability and personalization. Regular updates ensure that the device remains secure and up-to-date with the latest software enhancements.
Vivo X100 Ultra vs. Competitors
Feature
Vivo X100 Ultra
Samsung Galaxy S23 Ultra
iPhone 14 Pro Max
Body
164.1 x 75.6 x 9.2mm, 229g, IP69/IP68
163.4 x 78.1 x 8.9mm, 228g, IP68
160.8 x 78.1 x 7.65mm, 238g, IP68
Display
6.78″ LTPO AMOLED, 1440x3200px, 517ppi
6.8″ Dynamic AMOLED, 1440x3200px, 515ppi
6.7″ Super Retina XDR OLED, 1290x2796px, 460ppi
Chipset
Snapdragon 8 Gen 3
Snapdragon 8 Gen 2
A16 Bionic
Memory
Up to 1TB with 16GB RAM
Up to 1TB with 12GB RAM
Up to 1TB with 6GB RAM
Rear Camera
50 MP + 200 MP + 50 MP
108 MP + 12 MP + 10 MP + 10 MP
48 MP + 12 MP + 12 MP
Front Camera
50 MP
40 MP
12 MP
Battery
5500mAh, 80W wired, 30W wireless
5000mAh, 45W wired, 15W wireless
4323mAh
“Vivo X100 Ultra Dominates the Antutu Benchmark: A Comparative Analysis”
Vivo X100 Ultra Tops the Charts
The Vivo X100 Ultra has taken the smartphone world by storm, securing the top spot in the Antutu 10 benchmark scores. With an impressive score of 2,152,790, it outshines its competitors, showcasing Vivo’s commitment to performance and innovation. In this article, we will delve into the key features that make the Vivo X100 Ultra stand out and compare it with other leading smartphones in the market.
1. Vivo X100 Ultra: Performance Powerhouse
The Vivo X100 Ultra’s Antutu score of 2,152,790 is a testament to its superior performance. Powered by the Snapdragon 8 Gen 3 chipset and equipped with 1TB storage and 16GB RAM, the X100 Ultra delivers lightning-fast processing speeds and seamless multitasking capabilities. Its 1440 x 3200 px display resolution further enhances the user experience, making it the ultimate choice for tech enthusiasts and power users.
2. Vivo X100 Pro: A Close Competitor
Following closely is the Vivo X100 Pro with a score of 2,104,997. Although it is equipped with the Dimensity 9300 chipset, it maintains a competitive edge with 512GB storage and 16GB RAM. Its slightly lower display resolution of 1260 x 2800 px does not significantly detract from its overall performance, making it a strong contender in the high-end smartphone market.
3. Xiaomi 14 Ultra: Balancing Power and Performance
The Xiaomi 14 Ultra, scoring 2,014,262, is another formidable competitor. With the Snapdragon 8 Gen 3 chipset and 512GB storage with 16GB RAM, it offers robust performance. Its display resolution of 1440 x 3200 px is on par with the Vivo X100 Ultra, providing users with stunning visuals and excellent display quality.
4. Oppo Find X7 Ultra: Exceptional All-Rounder
The Oppo Find X7 Ultra achieves an Antutu score of 1,994,239, placing it among the top-performing smartphones. Its Snapdragon 8 Gen 3 chipset, combined with 512GB storage and 16GB RAM, ensures smooth and efficient performance. The display resolution of 1440 x 3168 px offers a slightly different aspect ratio but delivers comparable visual quality to the top contenders.
5. Honor Magic6 Pro: Competitive and Reliable
With a score of 1,858,934, the Honor Magic6 Pro holds its own in the competitive landscape. It features the Snapdragon 8 Gen 3 chipset, 512GB storage, and 12GB RAM. Although its display resolution of 1280 x 2800 px is lower than some of its peers, it still provides a satisfying user experience, making it a reliable choice for many users.
6. Samsung Galaxy S24 Ultra: The Premium Experience
The Samsung Galaxy S24 Ultra, scoring 1,823,822, is known for its premium features and build quality. Equipped with the Snapdragon 8 Gen 3 for Galaxy chipset, it offers 512GB storage and 12GB RAM. Its display resolution of 1440 x 3120 px is slightly lower than the Vivo X100 Ultra but still delivers exceptional visual clarity and detail.
7. OnePlus 12: Solid Performance
The OnePlus 12 achieves an Antutu score of 1,775,565. It features the Snapdragon 8 Gen 3 chipset, 512GB storage, and 16GB RAM, providing solid performance. The display resolution of 1440 x 3168 px ensures sharp and vibrant visuals, making it a competitive option in the flagship segment.
8. Sony Xperia 1 VI: Focus on Display Quality
With a score of 1,612,156, the Sony Xperia 1 VI emphasizes display quality. It is powered by the Snapdragon 8 Gen 3 chipset, with 256GB storage and 12GB RAM. Its display resolution of 1080 x 2340 px is lower than other high-end models but offers excellent color accuracy and detail, appealing to users who prioritize display performance.
9. Asus Zenfone 11 Ultra: Value for Performance
The Asus Zenfone 11 Ultra rounds out the list with a score of 1,400,646. Featuring the Snapdragon 8 Gen 3 chipset, 512GB storage, and 16GB RAM, it delivers solid performance at a more accessible price point. The display resolution of 1080 x 2400 px provides a good balance of visual quality and power efficiency.
Key Comparison Information in Tabular Format
Model
Antutu Score
Chipset
RAM
Storage
Display Resolution
Vivo X100 Ultra
2,152,790
Snapdragon 8 Gen 3
16GB
1TB
1440 x 3200 px
Vivo X100 Pro
2,104,997
Dimensity 9300
16GB
512GB
1260 x 2800 px
Xiaomi 14 Ultra
2,014,262
Snapdragon 8 Gen 3
16GB
512GB
1440 x 3200 px
Oppo Find X7 Ultra
1,994,239
Snapdragon 8 Gen 3
16GB
512GB
1440 x 3168 px
Honor Magic6 Pro
1,858,934
Snapdragon 8 Gen 3
12GB
512GB
1280 x 2800 px
Galaxy S24 Ultra
1,823,822
Snapdragon 8 Gen 3 for Galaxy
12GB
512GB
1440 x 3120 px
OnePlus 12
1,775,565
Snapdragon 8 Gen 3
16GB
512GB
1440 x 3168 px
Sony Xperia 1 VI
1,612,156
Snapdragon 8 Gen 3
12GB
256GB
1080 x 2340 px
Zenfone 11 Ultra
1,400,646
Snapdragon 8 Gen 3
16GB
512GB
1080 x 2400 px
Conclusion: Vivo X100 Ultra Leads the Pack on Antutu Benchmark
The Vivo X100 Ultra’s dominance in the Antutu benchmark scores highlights its superior performance and cutting-edge features. While other models like the Vivo X100 Pro, Xiaomi 14 Ultra, and Oppo Find X7 Ultra offer strong competition, the X100 Ultra stands out with its exceptional specs and high scores. For those seeking the best in smartphone technology, the Vivo X100 Ultra is the clear winner.
“Vivo X100 Ultra: A Deep Dive into 3D Mark Offscreen Scores”
Understanding 3D Mark Offscreen Scores
3D Mark Offscreen scores provide a valuable insight into the graphical performance of smartphones, evaluating how well devices handle high-resolution gaming and graphic-intensive tasks. This article examines the Vivo X100 Ultra’s performance in the 3D Mark Offscreen benchmarks and compares it with its peers to give you a comprehensive understanding of where it stands in the market.
1. Vivo X100 Ultra: Solid Performance
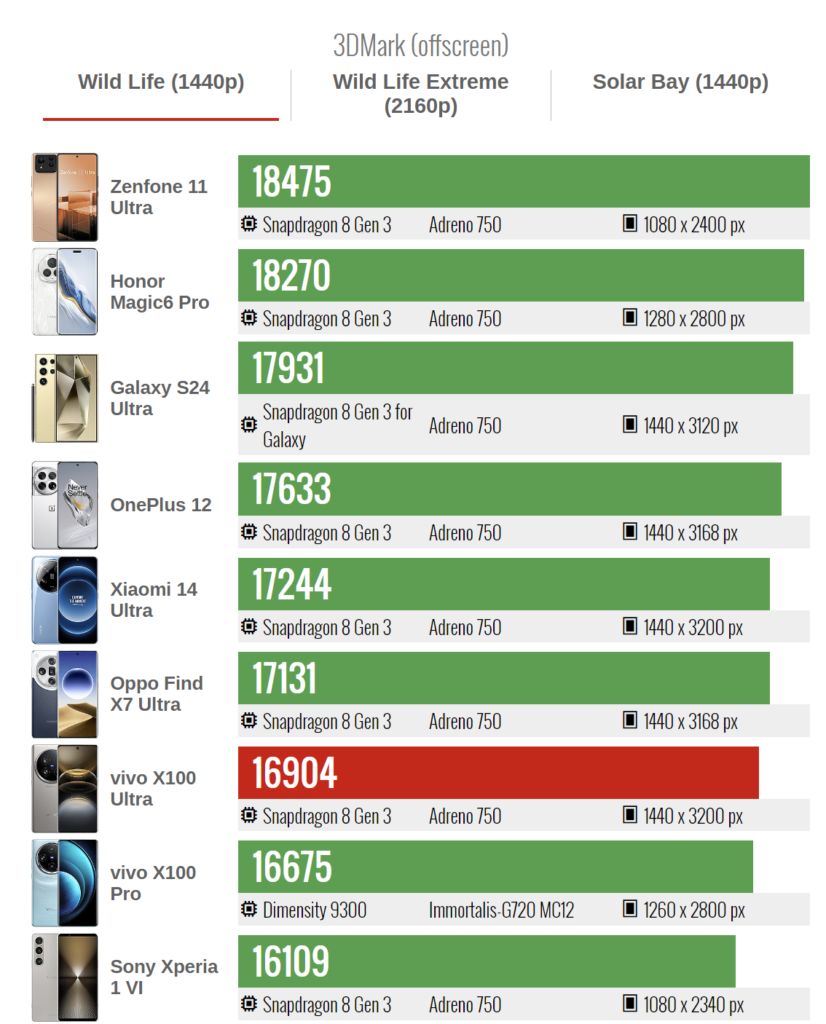
In the 3D Mark Wild Life (1440p) benchmark, the Vivo X100 Ultra scores 16,904, powered by the Snapdragon 8 Gen 3 chipset and Adreno 750 GPU. This score reflects its ability to deliver smooth and detailed graphics, making it a solid choice for gaming enthusiasts and users who demand high graphical fidelity.
2. Vivo X100 Pro: Close Behind
The Vivo X100 Pro, equipped with the Dimensity 9300 chipset and Immortalis-G720 MC12 GPU, scores 16,675. Despite a slight dip compared to the X100 Ultra, the X100 Pro still offers impressive graphical performance, ensuring a seamless experience for most graphic-intensive applications.
3. Zenfone 11 Ultra: Leading the Pack
Topping the chart is the Zenfone 11 Ultra with a remarkable score of 18,475. With the Snapdragon 8 Gen 3 chipset and Adreno 750 GPU, it outperforms its competitors, making it the top choice for those seeking unparalleled graphical performance in a smartphone.
4. Honor Magic6 Pro: Exceptional Graphics
The Honor Magic6 Pro follows closely with a score of 18,270. It also features the Snapdragon 8 Gen 3 chipset and Adreno 750 GPU, showcasing its capability to handle demanding graphics with ease. This makes it a strong contender in the high-performance smartphone segment.
5. Galaxy S24 Ultra: Balanced Performance
The Galaxy S24 Ultra scores 17,931, powered by the Snapdragon 8 Gen 3 for Galaxy chipset and Adreno 750 GPU. Its high-resolution display and strong graphical performance make it a balanced choice for users who want both power and visual quality.
6. OnePlus 12: Competitive Edge
With a score of 17,633, the OnePlus 12 holds a competitive edge. The Snapdragon 8 Gen 3 chipset and Adreno 750 GPU ensure that it can handle modern games and applications smoothly, maintaining a strong position in the market.
7. Xiaomi 14 Ultra: Robust Performance
The Xiaomi 14 Ultra achieves a score of 17,244, showcasing robust performance with the Snapdragon 8 Gen 3 chipset and Adreno 750 GPU. Its high display resolution further enhances the user experience, making it a popular choice among tech enthusiasts.
8. Oppo Find X7 Ultra: Impressive Capabilities
The Oppo Find X7 Ultra scores 17,131, powered by the Snapdragon 8 Gen 3 chipset and Adreno 750 GPU. Its impressive graphical capabilities make it suitable for a wide range of demanding applications, ensuring smooth and detailed visuals.
9. Sony Xperia 1 VI: Focus on Quality
Despite scoring 16,109, the Sony Xperia 1 VI offers excellent graphical performance with the Snapdragon 8 Gen 3 chipset and Adreno 750 GPU. Its focus on display quality and color accuracy makes it a great option for users who prioritize visual fidelity.
Key 3D Mark Information in Tabular Format
Model
3D Mark Score
Chipset
GPU
Display Resolution
Zenfone 11 Ultra
18,475
Snapdragon 8 Gen 3
Adreno 750
1080 x 2400 px
Honor Magic6 Pro
18,270
Snapdragon 8 Gen 3
Adreno 750
1280 x 2800 px
Galaxy S24 Ultra
17,931
Snapdragon 8 Gen 3 for Galaxy
Adreno 750
1440 x 3120 px
OnePlus 12
17,633
Snapdragon 8 Gen 3
Adreno 750
1440 x 3168 px
Xiaomi 14 Ultra
17,244
Snapdragon 8 Gen 3
Adreno 750
1440 x 3200 px
Oppo Find X7 Ultra
17,131
Snapdragon 8 Gen 3
Adreno 750
1440 x 3168 px
Vivo X100 Ultra
16,904
Snapdragon 8 Gen 3
Adreno 750
1440 x 3200 px
Vivo X100 Pro
16,675
Dimensity 9300
Immortalis-G720 MC12
1260 x 2800 px
Sony Xperia 1 VI
16,109
Snapdragon 8 Gen 3
Adreno 750
1080 x 2340 px
The Vivo X100 Ultra in Perspective on 3D Mark Score
The Vivo X100 Ultra’s 3D Mark Offscreen score of 16,904 places it among the top performers in the market, though it faces stiff competition from models like the Zenfone 11 Ultra and Honor Magic6 Pro. For users looking for a device that offers a balanced mix of performance and graphical prowess, the Vivo X100 Ultra remains a compelling choice. Its high-resolution display, powerful chipset, and capable GPU ensure that it can handle even the most demanding applications with ease.
Conclusion on Vivo X100 Ultra: The Pinnacle of Smartphone Innovation
The Vivo X100 Ultra is a testament to Vivo’s relentless pursuit of innovation and excellence. Its exquisite design, outstanding display, top-tier performance, and versatile camera system make it a formidable contender in the flagship smartphone market. Whether you’re a power user, a photography enthusiast, or someone who simply wants the best of the best, the Vivo X100 Ultra is a device that delivers on all fronts.
Final Thoughts: Should You Buy the Vivo X100 Ultra?
In a competitive landscape of flagship smartphones, the Vivo X100 Ultra stands out with its comprehensive set of features and attention to detail. It offers everything you could want in a high-end device, from performance and camera quality to design and battery life. If you’re looking for a smartphone that ticks all the boxes and then some, the Vivo X100 Ultra is an excellent choice that won’t disappoint.
Introduction: A Special Car for a Blockbuster Movie Kalki
Test drive a Kalki 2898 AD movie car worth ₹7 crores, designed specifically for a blockbuster movie that grossed ₹200 crores on its first day. This futuristic vehicle is packed with amazing features showcased in the film. Joining us on this exciting ride is none other than Techburner, aka Shlok Srivastava, a popular tech YouTuber known for his insightful and entertaining reviews.
Unique Design and Features
Techburner introduces us to this extraordinary car, featuring a robot that controls it, as seen in the movie. The tires are hollow and not connected to each other. Entry is through the front, with the seats moving and the steering wheel detachable. It’s a three-wheeler with the rear tire being the only one that moves. The car is rocket-shaped, giving it a unique look.
Durability and Tire Innovation
The tires are designed to be puncture-proof and made from steel wires instead of rubber. No matter what sharp objects it encounters, it won’t be affected. These tires are specially made by Ceat for this car. Techburner emphasizes how this innovative design ensures the tires are virtually indestructible.
Futuristic Truck in the Movie
In the Kalki 2898 AD movie, this car was used to save Deepika Padukone’s character. It’s equipped with large pipes, giving it a futuristic vibe. The car is made from a combination of metal and fiberglass, with a frame that’s completely metal. It’s a high, three-wheeler vehicle with unique suspension features. Shlok highlights the robust construction and the post-apocalyptic feel of the design.
Technology and Battery
This car runs on batteries, not petrol or diesel. The charging station is built into the car, and it has a massive back tire. The entire weight of the car is 6000 kilos, powered by a single large battery. Fire extinguishers are installed to handle any overheating automatically. Techburner delves into the car’s impressive battery technology and safety features.
Interior and Comfort
Inside, the Kalki 2898 AD car is hollow, designed to look post-apocalyptic. It has a unique steering mechanism and no rearview mirror, emphasizing its futuristic design. The seats and controls give a wild, fighter-jet feel. All buttons and screens are functional, enhancing the experience. Shlok’s excitement is palpable as he explores the high-tech interior.
Backseat Experience
The rear seat of the Kalki 2898 AD Car is surprisingly spacious with good legroom and a rear AC vent. The back area, designed to look like a prison, is actually comfortable and offers a great view. Techburner checks out the backseat, pointing out the thoughtful design elements that ensure comfort even in a futuristic setting.
Driving the Beast
Driving this Kalki 2898 AD car feels like operating a tank. It has hydraulic brakes and a gear system that shifts smoothly. The heavy-duty tires move effortlessly, and the entire experience is thrilling. Shlok shares his exhilarating experience of driving this beast, emphasizing the power and unique driving dynamics.
Conclusion: A Futuristic Marvel
This ₹7 crore Kalki 2898 AD car is not just a movie prop but a fully functional vehicle with advanced technology and a unique design. Driving it is an unforgettable experience, combining the feel of a tank with the look of a futuristic vehicle. With Techburner at the wheel, we’ve had an incredible journey exploring every feature of this amazing car.
The Apple iPhone 16 Pro Max is expected to be one of the most anticipated smartphone releases of 2024. With its cutting-edge technology, enhanced features, and sleek design, this device aims to set new benchmarks in the smartphone industry. In this comprehensive review, we will delve into the specifications, features, and overall performance of the iPhone 16 Pro Max, providing a detailed analysis that will help you understand why this phone is creating such a buzz.
Network Technology
The Apple iPhone 16 Pro Max supports a wide range of network technologies, ensuring robust connectivity across the globe. It supports dual-SIM functionality, with specific variations tailored for different regions. Here’s a detailed look at the network capabilities:
SA/NSA/Sub6 – International, SA/NSA/Sub6/mmWave – USA
Speed
HSPA, LTE, 5G, EV-DO Rev.A 3.1 Mbps
Body and Build
The iPhone 16 Pro Max features a premium build quality designed to withstand the rigors of daily use while maintaining an elegant appearance. Below are the specifics:
Body and Build
Details
Dimensions
163 x 77.6 x 8.3 mm (6.42 x 3.06 x 0.33 in)
Weight
225 g (7.94 oz)
Build
Glass front (Corning-made glass), glass back (Corning-made glass), titanium frame (grade 5)
SIM
“Nano-SIM and eSIM – International; Dual eSIM with multiple numbers – USA; Dual SIM (Nano-SIM, dual stand-by) – China”
Resistance
IP68 dust/water resistant (up to 6m for 30 min)
Additional Features
Apple Pay (Visa, MasterCard, AMEX certified)
Display
The iPhone 16 Pro Max offers a stunning display that enhances the user experience, whether you’re browsing the web, watching videos, or playing games. Here’s a closer look at its display features:
Display
Details
Type
LTPO Super Retina XDR OLED, 120Hz, HDR10, Dolby Vision
1328 x 2878 pixels, 19.5:9 ratio (~460 ppi density)
Protection
Ceramic Shield glass
Additional Features
Always-On display
Platform
The iPhone 16 Pro Max is powered by the latest iOS 18 and the new Apple A18 Pro chipset, ensuring a smooth and efficient performance. Here’s the breakdown:
Platform
Details
OS
iOS 18
Chipset
Apple A18 Pro (3 nm)
CPU
Hexa-core
GPU
Apple GPU
Memory
The phone provides ample storage options to meet the needs of different users, from average users to power users who require extensive storage for media and applications:
Memory
Details
Card Slot
No
Internal Storage
256GB 8GB RAM, 512GB 8GB RAM, 1TB 8GB RAM
Type
NVMe
Camera
Main Camera
The iPhone 16 Pro Max features a versatile and powerful triple-camera setup designed to capture stunning images and videos in various conditions. Here’s a detailed look at the main camera specs:
The iPhone 16 Pro Max offers excellent audio quality, although it does not include a 3.5mm headphone jack:
Sound
Details
Loudspeaker
Yes, with stereo speakers
3.5mm Jack
No
Connectivity
The device comes with the latest connectivity options, ensuring that users can stay connected and enjoy fast data transfer speeds:
Connectivity
Details
WLAN
Wi-Fi 802.11 a/b/g/n/ac/6e/7, dual-band, hotspot
Bluetooth
5.4, A2DP, LE
Positioning
GPS (L1+L5), GLONASS, GALILEO, BDS, QZSS, NavIC
NFC
Yes
Radio
No
USB
USB Type-C 3.2 Gen 2, DisplayPort
Additional Features
The iPhone 16 Pro Max includes a variety of sensors and additional features that enhance user experience and security:
Additional Features
Details
Sensors
Face ID, accelerometer, gyro, proximity, compass, barometer
Ultra Wideband 2 (UWB) Support
Yes
Emergency SOS via Satellite
Yes (SMS sending/receiving)
Battery and Charging
The iPhone 16 Pro Max offers robust battery life and multiple fast charging options, making it convenient for users on the go:
Battery and Charging
Details
Type
Not specified
Charging
Wired, PD2.0, 50% in 30 min (advertised); 15W wireless (MagSafe); 15W wireless (Qi2); 4.5W reverse wired
Conclusion
The Apple iPhone 16 Pro Max is set to be a game-changer in the smartphone market. Its state-of-the-art technology, impressive display, powerful performance, and advanced camera system promises to deliver an unparalleled user experience. Whether you’re a tech enthusiast, a professional photographer, or someone who simply wants the best smartphone on the market, the iPhone 16 Pro Max is poised to meet and exceed your expectations.
Stay tuned for its official release in September 2024 and be prepared to witness the next evolution in smartphone technology.
For Social Media apps like Instagram, Creating an effective social media campaign requires researching and understanding your target audience. You can do this by using a variety of tools and techniques, such as social listening. You can also build an audience persona and identify your brand’s core values.
Using social listening tools can be a great way to gather information about your audience. They can help you better understand your customers and create more effective marketing campaigns. They can also allow you to engage with your target audience directly. In addition, they can allow you to learn about your competitors and what trends are currently trending online.
Many brands use social listening software to monitor the online sentiment of their brand. These tools are able to sift through a huge amount of data. They provide insights into user conversations, ratings, and content. These tools can be used to track trends, adjust marketing, and build subscribers. They can also be used to find influencers.
You can start with free tools. These tools can be set up to send you email alerts when certain keywords are mentioned. They can also deliver RSS feeds to your inbox.
Some social listening tools are platform-specific, meaning they can only monitor a particular network. For example, Hootsuite, a popular tool for managing social media, covers multiple networks. Its team management facility allows you to oversee your social media efforts. The Hootsuite Social Marketing team strives to keep false positives under five percent.
You can also use a tool like Google Alerts to monitor your industry keywords. This way, you can check up on the competition and your own name. You can set up alerts to only monitor one phrase at a time. You can choose to focus on the name of your company or a particular product.
If you receive a social listening alert, it’s important to read the comments and determine if they are relevant to your target audience. Then, you can decide what action you want to take based on the results.
Social media has become the go-to place for people to share their experiences and commend a brand for good service. It’s the perfect place for marketers to collect information and make on-brand comments. You can thank people for their praise and respond to them directly. This helps build trust and a bond with your leads.
Creating an audience persona
Creating an audience persona on Instagram is one of the best ways to understand your target audience and to ensure your content will reach the right people. It is also a useful tool to help marketers send messages with confidence.
To create an effective audience persona, it is important to be accurate and to be as detailed as possible. The best personas are the ones that are realistic and do not represent stereotypes. In addition, they should include a name, a face, a job title, a business background, preferred sources of information, behavioural patterns, and a role in decision-making.
An effective audience persona will also include a stock photo. It will also reflect the ideal customer and should feel human. It will also be useful to use as a reference when brainstorming new content ideas. It will also help you to know when to make adjustments and when to move forward.
When you’re planning your marketing and content strategy, you should focus on the needs of your audience. They may have urgent needs, or they may have the desire to achieve specific goals. The offering you offer should clearly deliver a solution.
If you are using Facebook, you can check your profile performance report to find out who your most active followers are. You can also take advantage of Facebook’s demographics to see their age range, location, and gender. Then, you can determine what times of the day they are most active on the social network. You can also engage with these users via polls and live streams. This will allow you to gather valuable feedback from your audience.
You can also ask your audience questions through content or through direct interviews. You can then study the responses to these questions and craft a better audience persona. It is also a good idea to ask your audience questions on Instagram to find out which types of content they are most engaged with. You can then tailor your content to meet their interests.
In addition to providing valuable feedback, you can also use the data you gather to improve your paid social campaigns. You can also take advantage of specialized content editing tools to increase engagement.
Creating a hashtag strategy
Creating a hashtag strategy to research your target audience on Instagram is an important step to increasing brand visibility and boosting your follower count. However, there are several key factors to consider when coming up with your own hashtag strategy.
Choosing the best hashtags to use can be a daunting task, but there are some tips to help you narrow down your options. You want to make sure you are using hashtags that will be relevant to your specific niche. You will also want to make sure that you use the right types of hashtags.
You can find out more about what hashtags are most popular on Instagram by checking out the Explore page. This is an excellent source of inspiration for your hashtag strategy. You will see what hashtags have the most activity and which hashtags are being used to generate the most impressions.
You should also check out the hashtags your competition is using. The trick here is to find out what hashtags they are using and whether they are using the same hashtags you are. By doing so, you will be able to gain a better idea of how your competitors are promoting themselves.
To get the most out of your hashtag strategy, you should take the time to try out the more unusual hashtags. You may be surprised by the results you get. You might not see any real immediate change, but you can expect to increase your engagement and reach over time. You might also notice that you are putting more of your content in front of your target audience.
Using the right hashtags for your campaign is one of the best ways to get discovered on Instagram. But you need to remember that Instagram limits how much text you can put on your feed. Therefore, you will want to keep your captions short and sweet.
You should also look into hashtag tools that can speed up the process. You can use Later’s free Instagram Scheduler to automatically add hashtags to your posts. You can also use their First Comment tool to schedule your first comment at the exact moment your post is published.
Assessing your target audience
Defining your target audience is a vital step in marketing. It helps you identify and reach customers who will convert to buyers. There are several ways to achieve this. You can use a social listening tool to identify conversations about your brand or product. You can also analyze your competitors to discover insights into their audience.
You can also get a sense of your audience by studying their interests. This will help you decide whether your Instagram target audience is the right one. You can do this by using Instagram Stories polls. These polls ask questions about the interests, shopping habits, and expectations of your audience. The answers will tell you where your audience is spending their time. You can then use this information to target them.
In addition, you can use demographic surveys to determine your audience. These surveys will help you determine what your customers want and what they are willing to pay for. They are also helpful in identifying the values, aspirations, and pain points of your target audience.
You can also use customer surveys and social engagement to learn more about your target audience. You can identify patterns in your audience’s preferences, and discover surprising reasons people use your product. This can help you better tailor your ads to meet the needs of your audience.
You can also use the Instagram Insights feature to identify specific types of users who are following your brand. It can also reveal top locations of your followers. You can then test different ad formats to see which ones work best. This is a great way to target your audience, as well as to capture them before they leave your profile.
You can also assess your competitor’s Instagram audience. If your competitors are targeting certain groups, you may be able to learn more about them. You can also use the Phlanx Influencer Auditor tool to examine their content. This is a great tool for discovering influencers who may be a good fit for your business.
When you have a clear idea of your target audience, you can create a strategic marketing plan. A successful marketing plan will help you drive conversions and increase your bottom line.
How to Identify your Target Market
Here is a quick video to help you out in identifying your Target Market by Brand Master Academy.
Frequently Asked Questions on Growing your Instagram Audience
How Social Listing Tools Can help me in growing my Instagram Audience?
social listening tools can be a great way to gather information about your audience. They can help you better understand your customers and create more effective marketing campaigns. They can also allow you to engage with your target audience directly.
How Audience Persona can help me Grow my Instagram Audience?
Audience persona on Instagram is one of the best ways to understand your target audience and to ensure your content will reach the right people. It is also a useful tool to help marketers send messages with confidence.
How Hashtag Strategy can help me grow my Instagram Audience?
A hashtag strategy to research your target audience on Instagram is an important step to increasing brand visibility and boosting your follower count.
Why assessing your Target Audience is key for growing Instagram Followers?
Based on your Content, You should definitely assess your Target Audience So that you can target them in better ways and make them your followers.
Google Ads, Whether you’re just starting to promote your business online or you’re a seasoned veteran, there are some great new tools you can use to improve the effectiveness of your Google Ads campaign. These tips will help you get the most out of your ads and push your advertising budget further.
Table of Contents
Optimizing ad quality
Having a great quality score is important for better performance at a lower cost. Quality score is an algorithmic field and is used to identify ads that need improvement.
There are three main factors that drive ad quality. These factors include click-through rate (CTR), keyword history and historical performance. The better the QS, the more likely you are to rank high in the ad auction.
The quality score is calculated on a scale of 1 to 10. The higher the QS, the lower the cost per click.
AdWords automatically rotates ads to see which one performs better. When an ad has a low CTR, AdWords deletes it and creates a new ad.
Google also uses an ad preview tool called Google AD Diagnostics. This tool is designed to improve the user experience of your ads. It shows a preview of your ads in the search results. It also has a diagnostics feature that helps identify ads that need improvement.
Creating and optimizing Google Ads campaigns takes time and consistency. The first 30 days are crucial to a successful PPC campaign. If you make strategic moves during this period, it can make or break your result.
The Google Ads Quality Score is an algorithmic field designed to identify ads that need improvement. It can also help diagnose ads with lower click-through rates and landing page experiences.
Using ad extensions, ad rotations, and other optimization tactics will help you increase your quality score. While you cannot directly influence the quality score, you can maximize the impact of quality factors by creating ad copy that is relevant to your target audience.
A strong account structure is crucial to achieving stellar PPC results. Your account structure must follow best practices and must be linked to your Google Analytics account.
Display Network vs Search Network
Whether you’re a brand or a business, it’s important to decide whether a display network or search network campaign is right for you. Using the right mix of Google Ads can increase brand awareness and drive more sales.
Display network ads appear on partner websites, in apps, and in Gmail inboxes. They are not part of a shopping experience but are intended to capture attention in the early stages of the buying cycle.
The main advantage of display network ads is that they can be seen by people who are not actively looking for your product or service. This is especially useful for brand awareness campaigns.
Search network ads, on the other hand, are displayed as part of search engine results pages. These ads are keyword-based and intended to provide a quick response. They are a better option for brands and businesses with limited budgets.
In addition to being more accessible, search ads tend to lead to more conversions. Using keywords in your ads will also give you more control over who you reach and a higher ROI.
The Google Display Network, on the other hand, is a powerful remarketing tool. It reaches users across Google’s millions of partner sites and apps. It’s a good option for remarketing to opt out or potential customers.
When choosing between a Search Network and Display Network campaign, it’s important to keep your budget in mind. It can also influence your distribution channels. If you’re looking to attract customers who are already familiar with your brand, search ads might be a better option.
While network ads are a good marketing tactic, they don’t necessarily have the greatest bang for your buck. The default CTR for display network ads is below 0.5%.
Automated ads
Using Automated ads in Google Ads is a great way to increase revenue without having to do all the work yourself. These ads work by analyzing your website content and page layout, placing your ad where it will generate the most revenue.
Automated Ads on Google Ads are not only easy to use but offer an innovative way to monetize content. Google uses machine learning to determine the most relevant type of ad for a buyer. Google optimizes your campaign to achieve your goals.
There are four types of automated ads on Google Ads. This includes universal app campaigns, car ads, local campaigns and display ads.
Universal App campaigns are the first fully automated campaigns that Google Ads has offered. They are designed to help advertisers get more app installs and drive in-app conversions. These campaigns take structured data from an advertisers’ app listing and use it to optimize ads on websites.
Local campaigns are designed to help location-based businesses promote products on the search and display network. These campaigns also use location-based Google Maps to optimize ad placement. This campaign requires an offer, ad copy and some assets.
Automated ads on Google Ads can also be a great way to increase traffic to your website. Google ADS displays your ads on Google Search, Google Maps, YouTube and The Display Network. Google automatically tests and recommends different headlines and descriptions for your ad.
Display ads are image-based and typically appear on Google’s display network. These ads are usually 6-15 seconds long. They are paid per clicks.
Automatic call extensions can be added to your ads to make it easier for customers to call. When enabled, these extensions count as conversions.
Redirecting
Using Google Ads to create retargeting campaigns is a good way to improve your website’s conversion rate. It’s also a great way to engage with past site visitors. These ads are highly personalized and remind potential customers of the benefits of your products or services.
Retargeting can also help you get first-time visitors back to your site. In fact, retargeting with Google Ads can lead to a 700% increase in web traffic.
The retargeting works using cookies. These cookies tell the website owner that you have seen the ad. The retargeting platform serves advertisement on other websites. This can increase your conversion rate and revenue per visitor.
Google Ads offers many ways to target users, including interests, location, age and time spent on the site. It also offers great analytics. By using Google Ads, advertisers can target highly specific audiences. It’s also important to choose the right keywords for your remarketing campaign.
Google Ads has an extensive network. It reaches more than 90% of Internet users. Retargeting with Google Ads is a cost-effective method of advertising online. Retargeting can help you increase sales by 50%.
To use retargeting with Google Ads, you will need to add a tracking code to your website. Google Analytics offers two ways to add code: manually or with an integration partner. After installing the code, you will see results within a few days. Alternatively, you can look into other retargeting ad providers.
To perform retargeting with Google Ads, your site will need to have a global site tag. This tag captures the page title, URL and other information. It also provides the necessary information to create retargeting lists.
Analyzing results
Whether you’re using Google Ads to generate sales, leads or valuable customer activity, you need to track and analyze results to ensure your strategy is working. Analyzing Google Ad results can help you make informed business decisions, improve your ROI and optimize your account.
Some of the most important metrics to track include conversions, clicks, and impressions. These are some of the most common metrics you can track and compare to help optimize your account. You can do this using the reporting tools available on Google Ads.
Google Analytics also offers metrics that can help you analyze your Google Ads results. For example, engagement rate measures how often ad interactions occur. It is calculated by dividing the number of clicks by the number of impressions.
Google Data Studio is another reporting tool that provides an in-depth analysis of your account. Reports in this format can be tailored to meet your specific needs. It also includes key performance indicators (KPIs) that you can use to compare performance across campaigns.
If you want to see the big picture, check out the biggest changes report. This helps you compare your ad positions and identify which segments of your account have changed the most over a given period.
You should also consider using a combination calculator to see how the impact of the metrics you use in your campaign stack up. This helps determine the number of campaign component combinations you can use to achieve your objectives.
There are many other metrics you can track and analyze within Google Ads. Some are useful for improving ROI, others are for increasing conversions.
Choosing an ethernet cable for gaming can be a daunting task. There are so many options out there, it’s hard to know which one will be the best for your needs. The good news is that you’re not alone.
Different Category Ethernet cables
Having a fast connection to the internet is essential for gamers. A faster connection means a faster download or a better communication channel. Some games require vocal communication, and this is usually key to winning team-based games.
Having an ethernet cable can provide the speed boost you need, but it doesn’t have to cost a fortune. Some models are more durable than others, and some have sleeves to protect the wires from the elements. It’s also important to choose a quality cable that is compatible with your network router. You can find one with all the features you need, and the price will be a sliver of the cost of buying a new router.
Having the most reliable and functional connection is essential for gamers. If you can’t connect to the internet, you can’t connect to other gamers.
Check the Durability
Compared to the old RJ45 network cables, the durability of the latest gaming Ethernet cable is impressive. These devices are designed to improve communication between gaming consoles and other devices. These cables are also useful for downloading and uploading content. The best ones are made from durable materials that are resistant to extreme weather.
The e-sports industry has been growing at a rapid pace. This has caused a clamor for faster Internet connections. This, in turn, has created a demand for better game equipment. This has led to the rise of gaming Ethernet cables. The newest kind has double-shielding to ensure that your connections stay solid.
The best e-sports gaming Ethernet cable is one that is made by a reputable brand. This will ensure that you are not paying for a fake product that could do you more harm than good. The right one will also have a variety of lengths, allowing you to select the ideal cable for your situation.
EMI (electromagnetic interference) of Cable
EMI (Electromagnetic Interference) is a form of electrical noise that is caused by nearby electrical equipment. In addition to land lines, the sources of EMI can include cordless phones, thermostats, charge controllers, and DC light ballasts.
Electromagnetic interference can be a nuisance. It can affect audio, video, and data transmission. It can interfere with the Bluetooth function of your phone or mobile device, and even disrupt communication with your air conditioning unit.
The best way to prevent EMI is to choose a shielded cable. These cables have an overall shield and a twisted pair inside. This shielding can provide close to 100% protection from EMI.
The twisted pairs can contain stranded or solid copper wires. The inner spline provides rigidity and allows the twisted pairs to separate.
Cat 7 vs Cat 8 Ethernet Cable
Buying an Ethernet cable isn’t hard, but you may not know what type to get or when to upgrade. There are many types to choose from, including Cat 7 and Cat 8 cables. They are designed for transferring data at a fast speed and are generally used for home networks, data centers, and enterprise applications.
The Cat 8 and Cat 7 cables have a number of similarities, but they also have some differences. The main difference is in the frequency. While both have a transmission frequency of 2,000 MHz, the Cat 8 cable is capable of operating at a higher frequency, which allows for faster data transfer. It also has additional shielding, which assists in eliminating all forms of crosstalk.
The Cat 7 cable is not as durable as the Cat 8, but it is still a reliable cable for your gaming PC. It is also less susceptible to interference and will offer strong data transfer rates at extended distances.
Cat 5e vs Cat 6 Ethernet Cable
Choosing the right Ethernet cable for gaming is an important decision. Getting the right one will not only help you enjoy your games more, but it will also save you money.
When it comes to ethernet cables, there are several different categories. Some are more popular than others, but each is a good option for a variety of situations. The important thing is to find a network cable that will work with your current equipment and accessories.
Cat 5e and Cat 6 are both types of data cabling. Both are designed for fast internet access. They can both be purchased for a reasonable price. However, it is always best to look for a supplier that offers a lifetime guarantee. This will give you peace of mind.
If you are a hardcore gamer, it is a good idea to purchase a cable that will give you the most speed. A Cat 6 or a Cat 7 cable will be best.
Whether you have lost your key, or you suspect someone has a passcode to your home, you may want to know how to reset a Kwikset lock code. These locks are more secure than standard deadbolts, but they can also have issues. Luckily, there are ways to fix these problems. Using the correct procedure to reset a Kwikset smart lock can get you back into your home. Here are the steps you need to follow to do so.
First Step in resetting Kwikset Lock Code
First, you will need to remove the cover window on the panel that holds the lock in place. This can be done by lifting the whole cover or by unscrewing the side screws. Then, you will need to remove the battery pack that is located on the top of the panel.
Next Step in resetting Kwikset Lock Code
Next, you will need to find the Programming button, which is usually the larger button in the center. This is where you will set up all of the functions of your lock. During programming, you will need to enter the Programming Code, which is an added security feature. The Programming Code should be between four and ten digits. If the code you have is not enough, you can add another code, but make sure that it is in the proper range. The Programming Code cannot be the same as any user code.
After Finding the Programming Button
After you have found the Programming button, you will need to enter the current Programming Code into the keypad. You should hear a beeping sound while you are doing this. You will also need to enter a User Code, which is a one-time code that you can use once to activate the lock. These codes will be removed once you are done with the programming process. If you have a SmartCode 917, you will need to enter a Master Code before you can enter a new user code.
You will need to rekey both cylinder sets of the lock. You can use either a Phillips-head screwdriver or a flathead screwdriver to do this. You will need to replace the battery pack on the lock, as well. You should also remove the lock cylinder from the lock housing. You should be able to do this by pulling it up.
If you have a Kwikset SmartCode door lock, you should be able to locate the button by looking at the lock. You will need to press it after you enter the User Code. Once you do this, the LED will flash green. If this is not the case, you will need to do some additional programming to reset a Kwikset.
After Completing all the Steps
Once you have completed the steps, you will be able to unlock and unlock your door. You can also update the firmware of your smart lock. The lock will then be able to be paired with your home security system. In addition, you will be able to add User Codes to the lock. If you are having trouble resetting your Kwikset, you may need to use the Premis app to unmute the sound. This is a free app that can help you with the process. It will also allow you to delete all of your codes at once.
Top Kwikset Frequently Asked Questions
How to reset Kwikset Lock Code?
you can do the reset of Kwikset Lock Code by doing a few steps like opening the Lock, removing the battery, reset the user codes.
Can I update the Firmware of Kwikset Lock Code?
Yes, you can easily update the Firmware of your smart Lock.
Can I pair the Kwikset Lock with Home Security System?
Yes, You can pair the Kwikset Lock with Home Security System.
How can I remove the cover of Kwikset Lock?
You can remove the cover of Kwikset Lock by lifting the whole cover or by unscrewing the side screws.
What is the work of the Programming button in Kwikset Lock?
The programming Button is the larger button in the centre. This is where you will set up all of the functions of your lock. You will need to enter the Programming Code, an added security feature during programming. The Programming Code should be between four and ten digits